RemoteIoT VPC SSH configuration on Raspberry Pi using AWS offers endless possibilities for remote management, secure communication, and cloud integration. Whether you're a hobbyist, a developer, or an enterprise user, understanding how to set up a secure connection between your Raspberry Pi and AWS is crucial for modern IoT applications. This guide will walk you through every step of the process, ensuring you can download and configure your system for free using Windows.
As the world becomes increasingly connected, the demand for secure and scalable IoT solutions continues to grow. RemoteIoT VPC SSH on Raspberry Pi AWS allows users to remotely access their devices while maintaining high levels of security and flexibility. This setup is particularly useful for monitoring, automation, and data processing tasks.
This article will explore the technical aspects of setting up a RemoteIoT VPC SSH environment on Raspberry Pi AWS, including step-by-step instructions, best practices, and troubleshooting tips. By the end of this guide, you'll have the knowledge and tools to implement this powerful system on your own.
Read also:Andrew Shue The Journey Of A Multifaceted Actor Activist And Entrepreneur
Table of Contents
- Introduction to RemoteIoT VPC SSH
- Raspberry Pi Setup for RemoteIoT
- AWS VPC Configuration
- Establishing an SSH Connection
- Security Best Practices
- Troubleshooting Tips
- Subheading: Downloading Free Tools
- Subheading: Windows Integration
- Advanced Features and Customizations
- Conclusion and Next Steps
Introduction to RemoteIoT VPC SSH
RemoteIoT VPC SSH is a powerful solution that combines the versatility of Raspberry Pi with the scalability of Amazon Web Services (AWS). This setup enables users to remotely access their IoT devices through a secure Virtual Private Cloud (VPC) environment, ensuring data protection and efficient resource management.
The integration of SSH (Secure Shell) adds an extra layer of security by encrypting communication between the Raspberry Pi and the AWS server. This method is particularly useful for users who need to manage their devices from remote locations without compromising on security.
By leveraging AWS's robust infrastructure, users can scale their IoT projects effortlessly. Whether you're running a small-scale home automation system or managing a large network of sensors, RemoteIoT VPC SSH provides the flexibility and reliability required for modern IoT applications.
Raspberry Pi Setup for RemoteIoT
Raspberry Pi Hardware Requirements
Before diving into the software setup, it's essential to ensure your Raspberry Pi is equipped with the necessary hardware. Below are the key components required for a successful RemoteIoT VPC SSH setup:
- Raspberry Pi 4 Model B (or newer)
- MicroSD card with at least 16GB storage
- Power supply compatible with Raspberry Pi
- Ethernet cable or Wi-Fi adapter for internet connectivity
Installing the Operating System
For optimal performance, we recommend using Raspberry Pi OS Lite. This lightweight operating system is ideal for headless setups and minimizes resource usage. Follow these steps to install the OS:
- Download Raspberry Pi Imager from the official website.
- Select Raspberry Pi OS Lite as the operating system.
- Insert the microSD card into your computer and write the image to the card.
- Insert the microSD card into your Raspberry Pi and power it on.
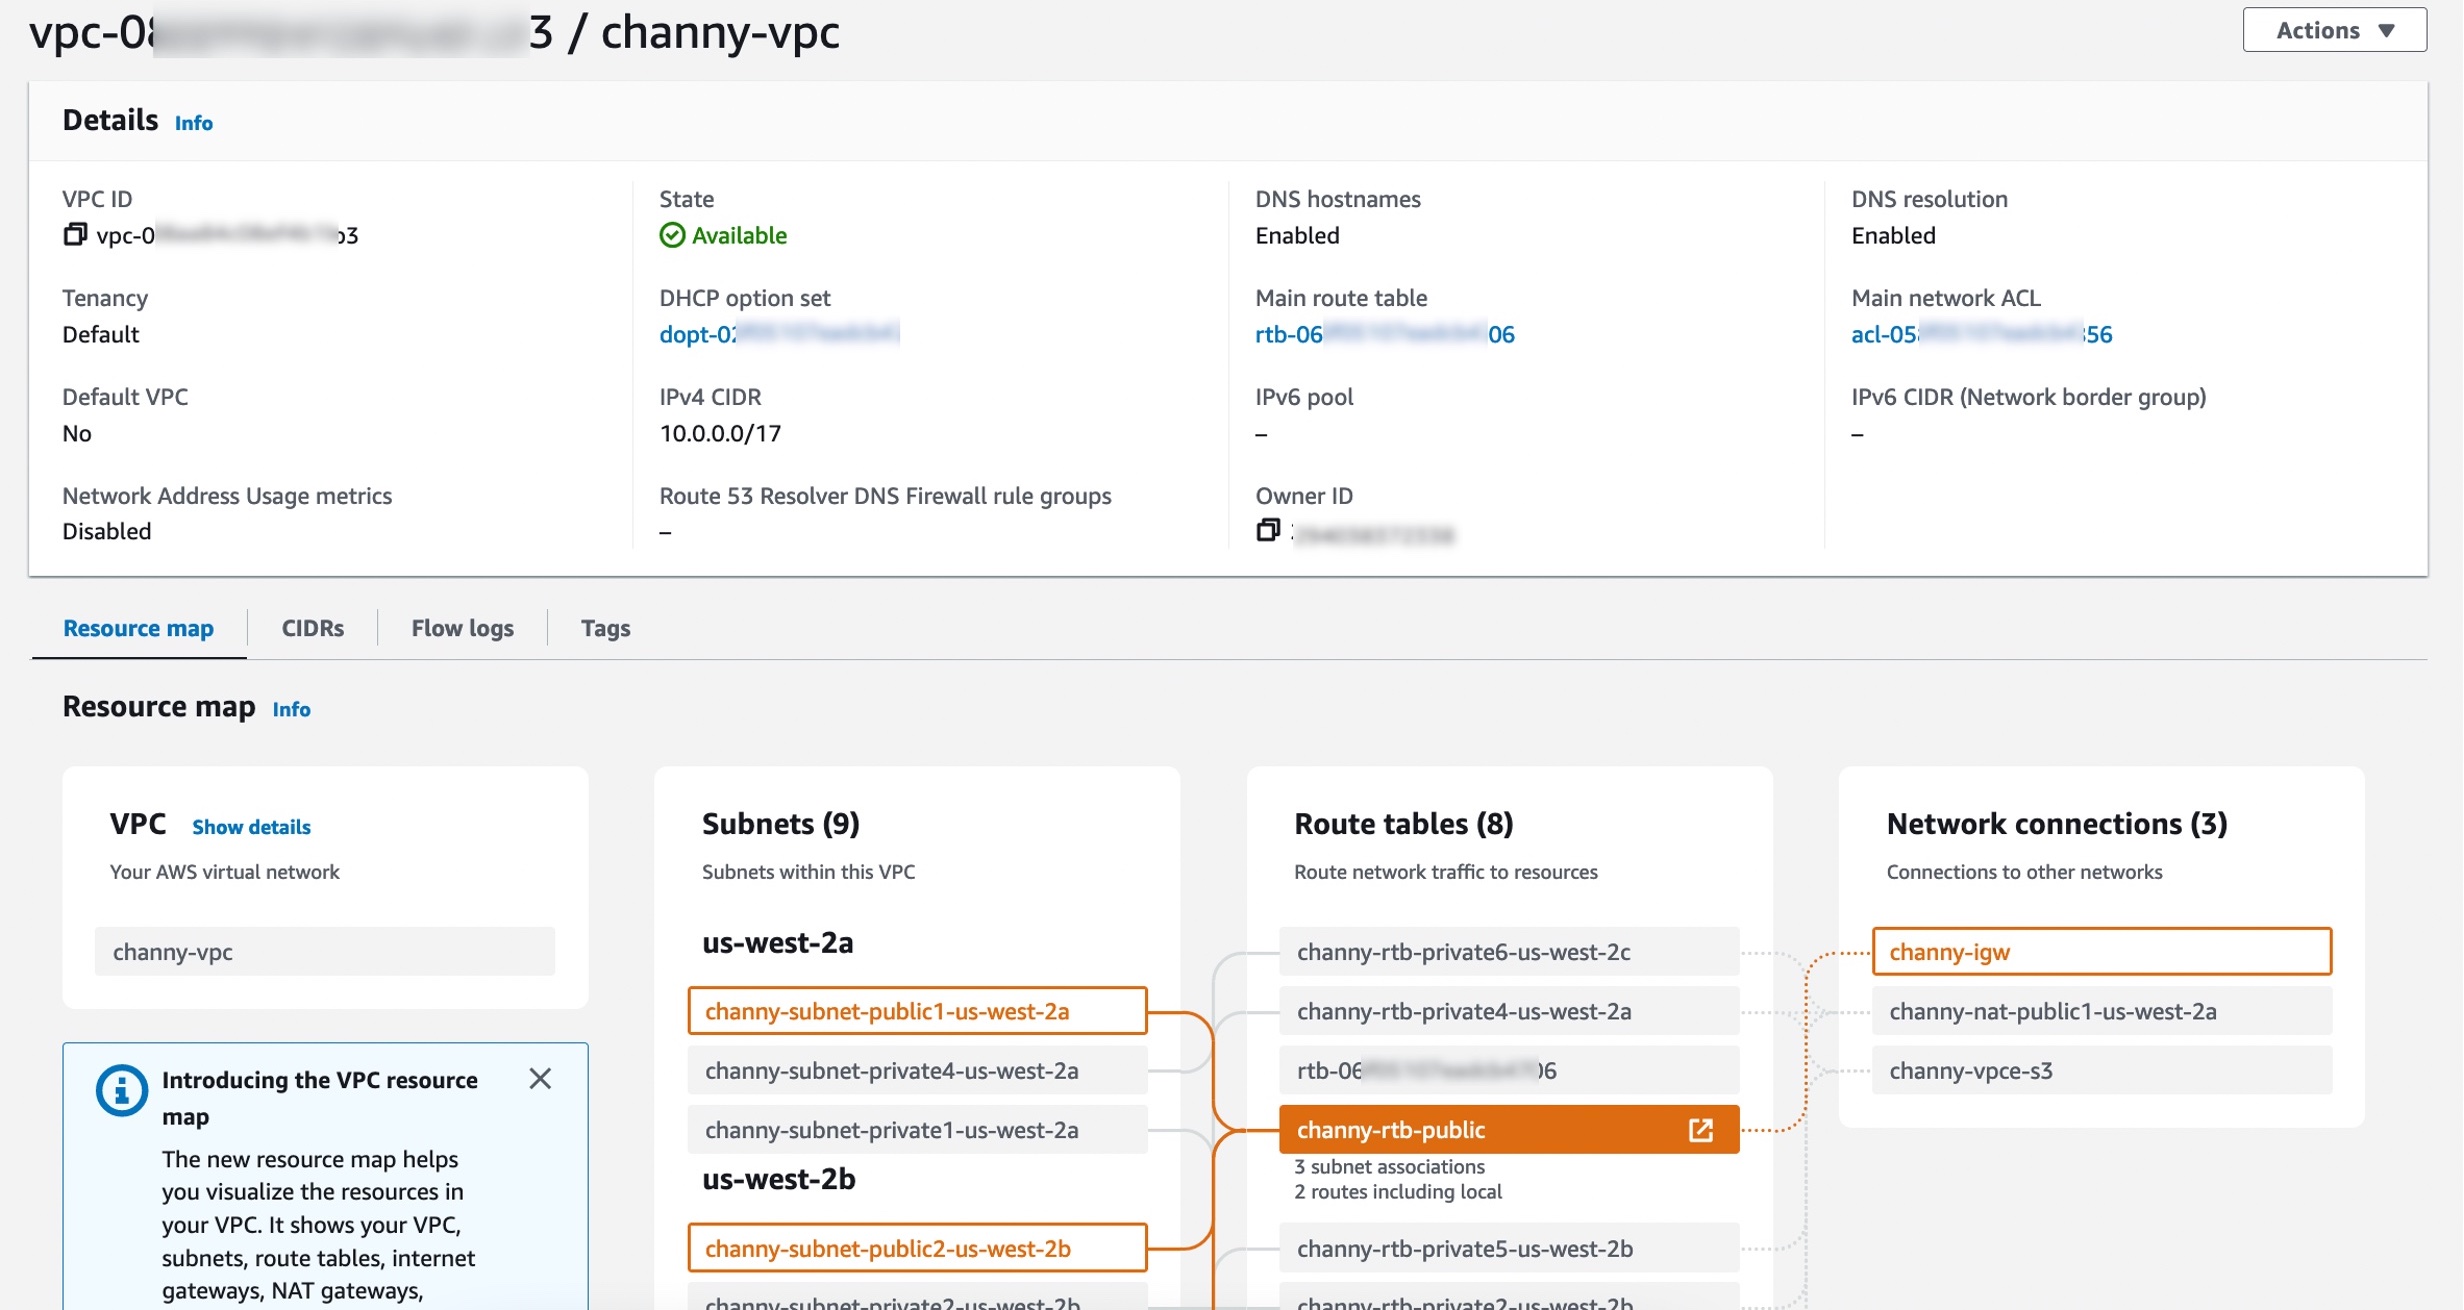
AWS VPC Configuration
Creating a New VPC
Amazon Web Services provides a user-friendly interface for setting up a Virtual Private Cloud (VPC). Follow these steps to create a new VPC:
Read also:Zachary Mabry The Rising Star In The Entertainment Industry
- Log in to your AWS Management Console.
- Navigate to the VPC Dashboard and select "Create VPC."
- Enter a name for your VPC and specify the IPv4 CIDR block.
- Review the settings and launch your new VPC.
Configuring Security Groups
Security groups act as virtual firewalls for your VPC, controlling inbound and outbound traffic. To enable SSH access:
- Create a new security group and name it "RemoteIoT SSH."
- Add a rule allowing TCP traffic on port 22 (SSH).
- Specify the source IP address or leave it open for testing purposes.
Establishing an SSH Connection
Once your Raspberry Pi and AWS VPC are configured, it's time to establish an SSH connection. This process involves generating SSH keys, transferring them to your Raspberry Pi, and connecting via a terminal application.
Generating SSH Keys
Use the following command to generate an SSH key pair on your local machine:
ssh-keygen -t rsa -b 4096
Transferring Keys to Raspberry Pi
Transfer the public key to your Raspberry Pi using the following command:
ssh-copy-id pi@raspberrypi.local
Connecting via SSH
Open a terminal and enter the following command to connect:
ssh pi@raspberrypi.local
Security Best Practices
Security is paramount when working with remote IoT systems. Below are some best practices to ensure your RemoteIoT VPC SSH setup remains secure:
- Use strong, unique passwords for all accounts.
- Disable password-based authentication and rely solely on SSH keys.
- Regularly update your Raspberry Pi and AWS environment to patch vulnerabilities.
- Monitor logs for suspicious activity and configure alerts for unauthorized access attempts.
Troubleshooting Tips
Encountering issues during setup is common. Below are some troubleshooting tips to help you resolve common problems:
- Verify network connectivity by pinging your Raspberry Pi from your local machine.
- Check AWS security group rules to ensure SSH traffic is allowed.
- Ensure the SSH service is running on your Raspberry Pi by running "sudo systemctl status ssh."
Subheading: Downloading Free Tools
Several free tools are available to assist with RemoteIoT VPC SSH setup. Below are some recommendations:
- PuTTY: A popular SSH client for Windows users.
- WinSCP: A secure file transfer application for managing files on your Raspberry Pi.
- Raspberry Pi Imager: A free tool for installing operating systems on your microSD card.
Subheading: Windows Integration
Integrating your RemoteIoT VPC SSH setup with Windows involves configuring your local machine to communicate with your Raspberry Pi and AWS environment. Follow these steps:
- Download and install PuTTY or Windows Terminal.
- Enter the IP address of your Raspberry Pi and connect using SSH.
- Use WinSCP to transfer files between your Windows machine and Raspberry Pi.
Advanced Features and Customizations
Once your basic setup is complete, consider exploring advanced features to enhance functionality:
- Automated Backups: Schedule regular backups of your Raspberry Pi data to AWS S3.
- Load Balancing: Distribute traffic across multiple Raspberry Pi devices for improved performance.
- Custom Scripts: Develop scripts to automate routine tasks and streamline operations.
Conclusion and Next Steps
In conclusion, setting up a RemoteIoT VPC SSH environment on Raspberry Pi AWS is a powerful way to manage IoT devices securely and efficiently. By following the steps outlined in this guide, you can create a robust system that meets your specific needs.
We encourage you to share your experience in the comments section below and explore other articles on our website for more insights into IoT and cloud computing. Don't forget to bookmark this page for future reference!
Thank you for reading, and happy tinkering!